Tuesday, April 12, 2011

Bow Pillows


This is a two-in-one DIY project: curtains AND pillows! When I moved into my last apartment I needed some curtains for my bedroom window...I didn't want the plain and boring ones from Wal-mart, but that was about all my small college-student budget would allow. I ended up buying a solid color set of cheap curtains and made them my own. I cut the center out and added some toile fabric I found in the bargain bin into the middle. Who would have guessed these were a Wally World special?

   
I have LOVED these curtains and they were very easy to create! The fabric added pizazz to curtains that were originally nothing special.

After I finished I still had middle section of the curtains that I cut out. The leftover curtain fabric sat in my closet for a long time, just waiting on a project to use them. A couple of weeks ago I went to an estate sale and bought some pillows that needed some personality. When I got home I realized the fabric form the curtains would cover the pillows perfectly... And so the next project began!


Supplies:
Burlap or Burlap like fabric
White fabric
Sewing machine
Pins
Iron
Easy hem- this can be found at any fabric store it seems things together with heat from the iron

1. Since the burlap fabric was already cut I didn't have to do anything, but you would cut your fabric into two squares a little larger then the pillow. Next, cut your white fabric into two long pieces. These pieces should be double the size you want the bow to be because you are going to fold the pieces.


My first attempt at cutting the fabric was a failure.  My dog Malachi thought the fabric was a perfect place for him to hang out. 

These are the two pieces I cut the fabric into. Note: The pieces are extra long. Once I tied the bow, I cut them down just to be sure I had enough fabric. 
Once the fabric was cut into strips, I folded it over so both sides over lapped in the middle- this picture is a little difficult to see, but think about folding it like you would fold a letter to put into a envelop. 

Next, I ironed both pieces well. I wanted them to stay folded even while I was sewing. 

Then I started to assemble the pillow. I laid both burlap pieces on top of on another and pinned two opposite sides together.  On the sides that were not pinned, I measured and found the center.
Once I found the center, I put the white fabric inside. Do this on both sides. Make sure you put the seem side up on both sides, so when you tie the bow you don't have one side with a seem and one side without. 


Sew three of the sides together. Make sure to sew the two sides that have the white fabric pinned on them and then one other of your choice. Note: the stair climber in the background, the ancient sewing machine and the lack of a sewing table, you don't have to be a sewing professional to make these... all you need is a sewing machine that works and a tiny bit of space.

Flip the pillow case right side out and then insert the pillow. Once the pillow is inside, sew the fourth side shut. This was the hardest part! Pulling the fabric tight and fitting it under the sewing machine was a little difficult but we managed with some patience.


Once all four sides are sewn, tie a pretty bow in the middle. To get the loops of the bow to stay in place, I hand sewed them to the burlap fabric. Once the bow was tied I cut the extra fabric off and ironed the hem with the easy hem.


This is the finished product! I think they are going to look great on the two recliners in my new apartment!


Side note- While my mom was helping me sew the pillows, I asked her where she learned to sew. She responded saying the summer after 8th grade she took a sewing class that taught her the basics. She then proceeded to tell me that she saved the first thing she ever made. It is a skirt she loved wearing to school her ninth grade year. The picture below is the skirt she showed me. It is tiny! So small I could only fit it over one of my thighs. Apparently I got my dads genes!


This post goes out to my mom. She kept me laughing with her teeny tiny skirt and she helped a lot with my sewing endeavors.

Sunday, April 3, 2011

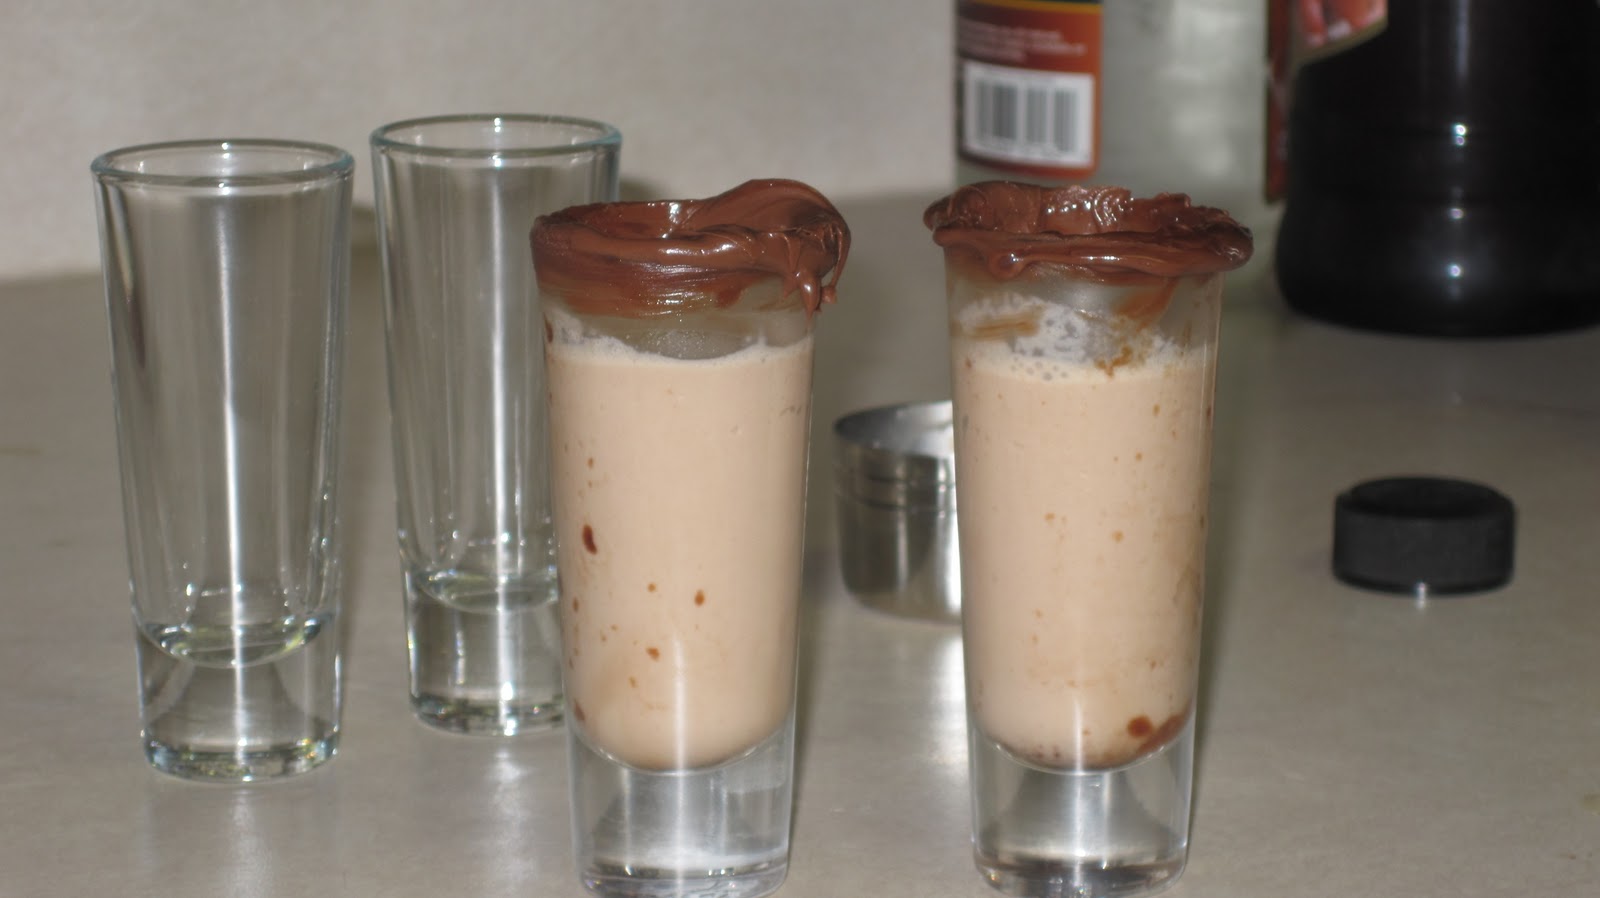
Nutella Shots

Being 23 is kind of like being 13
Nutella shots & a Pinata

My roommate turned twenty-three on Saturday. What are you supposed to do for a 23rd birthday? I was talking to my friend Megan about this predicament a couple of weeks ago. She made a very interesting comment that I think is right on. "Being 23 is kind of like being 13," She said "At 13 you are at an awkward stage between being a teenage and still being a kid. At 23 you are awkwardly between an adult and a college student." So for this 23rd birthday we teeter tottered between being an adult and acting  like a college student. We had Nutella shots and a pinata! 


Ingredients
  • Nutella
  • Chocolate Liqueur
  • Hazelnut Liqueur
  • Heavy Whipping Cream
  • Chocolate Syrup
When I looked up a recipe for shots with Nutella they all called for expensive Godiva Liquors and things like that. Since I'm ballin' on a budget, I went to the store and came up with my own recipe. All together I think I spent around 25 bucks and it  made a ton of shots!


  1. Mix the chocolate syrup into the heavy whipping cream, just like you are making chocolate milk. I only used about 1/2 of the carton of whipping cream.
  2. Pour equal parts Chocolate liquor and Hazelnut liquor into a shaker.
  3. Pour twice as much chocolate whipping cream as Chocolate and Hazelnut liquor into the shaker and shake. At first I used equal parts of all three ingredients and it was way to potent!
  4. After you shake all the ingredients put some Nutella on a plate and dip the top of the shot glasses into to Nutella. Making sure the whole top is generously covered in Nutella.
  5. Finally, pour the shot into the shot glass
  6. ENJOY! Responsibly of course 


The Birthday Girl with her yummy shot!

The Pinata

The Swiffer

The thing was indestructible- a high heel did the trick

Tuesday, March 29, 2011

Invitations

With Graduation looming I needed to come up with a personalized invite to my graduation party. I wanted one that was themed towards my school without being cheesy. Everything I saw in the store just wasn't right. My mom came up with the idea to make my own. Here is a picture of the final product.


Supplies:
Card stock solid paper
Patterned paper
Ribbon
tape
double stick tape
White card stock
Paper cutter
Printer

  • I used four things of double stick type and two things of ribbon. I needed 30 invites so if you are making a smaller number of invitations you will not need as much. I would suggest using a thicker ribbon like the ribbon above with the white stripe. The thinner all navy ribbon doesn't lay as flat on the invitation.
Instructions:
  • Cut solid card stock paper into pieces depending on how large you want your invites, then fold in half to form the card shell. I bought my paper at the local craft store it was in the paper section. They were having a 50% off paper sale! I cut it into three strips and then folded it in half (Hamburger Style).


  • Then cut the patterned paper into smaller strips. I cut the patterned paper in half and then into four strips per page. In the picture below the navy card stock is already folded in half. 


  • Next I measured the ribbon against the patterned paper and cut it a little longer then the patterned paper. 
  • After all the ribbon was cut I took the regular tape stretched it across the patterned side of the paper and then taped it on the back. 

  • Once the ribbon is applied I took the double stick tape and taped the patterned paper with the ribbon to the folded solid paper. I went a little over board with the taped (which is probably why it took me 4 things of double stick tape to get the project finished) and used four pieces for every invite but I think two small pieces will be sufficient. 

  • This next part is where my mom really came to the rescue. I got on Word and printed out squares that said 2011. When I put them on the invites it looked really cheap and hand made. Supermom got on Word and created the monogram and graduation date (pictured below) in about .5 seconds!
  •  After we printed out the monogram and and cut it into squares with the paper cutter. We taped the small squares with double stick tape on top of the ribbon. I only used one piece of double stick tape for this. I learned my lesson with the last double sticking issue. You can use all kinds of different things besides the monogram. Pictures/words/stickers anything pertaining to your personal invite.
  • The inside we did on word too. We put all the info together printed it out on white card stock and double stick taped it in the inside on the invite!
  • This was the final product:
This post goes out to my mom...without her help I would have had a plain and tacky 2011 stuck on the front. She also helped when I got in a fight with the paper cutter and could not for the life of me cut a straight line. Thanks Mom!

Wednesday, March 23, 2011

Moving up in the world

I am moving into my first big girl apartment in May and my DIY bone has gone into over drive. This week is the first week I have had time to work on the projects.  I couldn't be happier to dedicate the whole week to creating things for the new apartment. Right now I am working on a headboard made from an old iron fence, burlap pillows and lace printed curtains. Hopefully the pictures will be up by the end of the week.

On top of moving and decorating an apartment I am planning my graduation party. Tonight has been dedicated to cutting paper and creating the invitations. They are coming along well and I will post the pictures and instructions soon!