

Supplies:
Card stock solid paper
Patterned paper
Ribbon
tape
double stick tape
White card stock
Paper cutter
Printer
- I used four things of double stick type and two things of ribbon. I needed 30 invites so if you are making a smaller number of invitations you will not need as much. I would suggest using a thicker ribbon like the ribbon above with the white stripe. The thinner all navy ribbon doesn't lay as flat on the invitation.

Instructions:
- Cut solid card stock paper into pieces depending on how large you want your invites, then fold in half to form the card shell. I bought my paper at the local craft store it was in the paper section. They were having a 50% off paper sale! I cut it into three strips and then folded it in half (Hamburger Style).

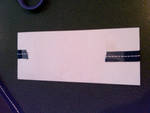
- Then cut the patterned paper into smaller strips. I cut the patterned paper in half and then into four strips per page. In the picture below the navy card stock is already folded in half.

- Next I measured the ribbon against the patterned paper and cut it a little longer then the patterned paper.
- After all the ribbon was cut I took the regular tape stretched it across the patterned side of the paper and then taped it on the back.
- Once the ribbon is applied I took the double stick tape and taped the patterned paper with the ribbon to the folded solid paper. I went a little over board with the taped (which is probably why it took me 4 things of double stick tape to get the project finished) and used four pieces for every invite but I think two small pieces will be sufficient.

- This next part is where my mom really came to the rescue. I got on Word and printed out squares that said 2011. When I put them on the invites it looked really cheap and hand made. Supermom got on Word and created the monogram and graduation date (pictured below) in about .5 seconds!
- After we printed out the monogram and and cut it into squares with the paper cutter. We taped the small squares with double stick tape on top of the ribbon. I only used one piece of double stick tape for this. I learned my lesson with the last double sticking issue. You can use all kinds of different things besides the monogram. Pictures/words/stickers anything pertaining to your personal invite.
- The inside we did on word too. We put all the info together printed it out on white card stock and double stick taped it in the inside on the invite!
- This was the final product:
This post goes out to my mom...without her help I would have had a plain and tacky 2011 stuck on the front. She also helped when I got in a fight with the paper cutter and could not for the life of me cut a straight line. Thanks Mom!